
VC500 & VC500SE – Installation Guide
Important Software Update.
We now recommend using OBS Studio for transferring your tapes. OBS Studio is 100% free and works reliably on modern Windows and Mac computers.
Welcome! This step-by-step guide will walk you through setting up your Diamond VC500 or VC500SE capture device to save your home video tapes onto your computer. If you prefer to watch a video, follow along with our YouTube Video Tutorial here. Timestamps in this guide match the video exactly.
1 What You Need & How to Plug It In (0:03)
Before you begin, make sure you have the following ready.
- Your Computer: A Windows PC or Mac.
- Your Diamond Device: VC500 or VC500SE capture dongle.
- Cables: Standard RCA cables (Yellow = Video, Red & White = Sound).
- Video Player: Your VCR, Camcorder, or DVD Player.
Step-by-Step Connection Guide (0:18)
- Plug one end of the colored cables into the OUTPUT ports on the back or front of your VCR or Camcorder. (Make sure not to use ports labeled “INPUT”).
- Plug the matching yellow, red, and white ends into your Diamond capture device.
- Plug the USB connector directly into a USB port on your computer. (For best results on desktop computers, use a USB port on the back).
2 Downloading OBS Studio (0:34)
Driver Note: No disc or manual driver setup is needed. Windows and Mac will automatically detect your Diamond capture device once plugged in.
- Go to obsproject.com and click the download button for your computer (Windows or Mac).
- Open the downloaded file to install OBS Studio, then launch the program.
- If an “Auto-Configuration Wizard” popup appears on screen, simply click Cancel (1:14).
3 Setting Up Picture & Video (1:30)
- In the Sources box near the bottom of the OBS screen, click the + (Plus) icon and select Video Capture Device.
- Type a friendly name like “VHS” and click OK.
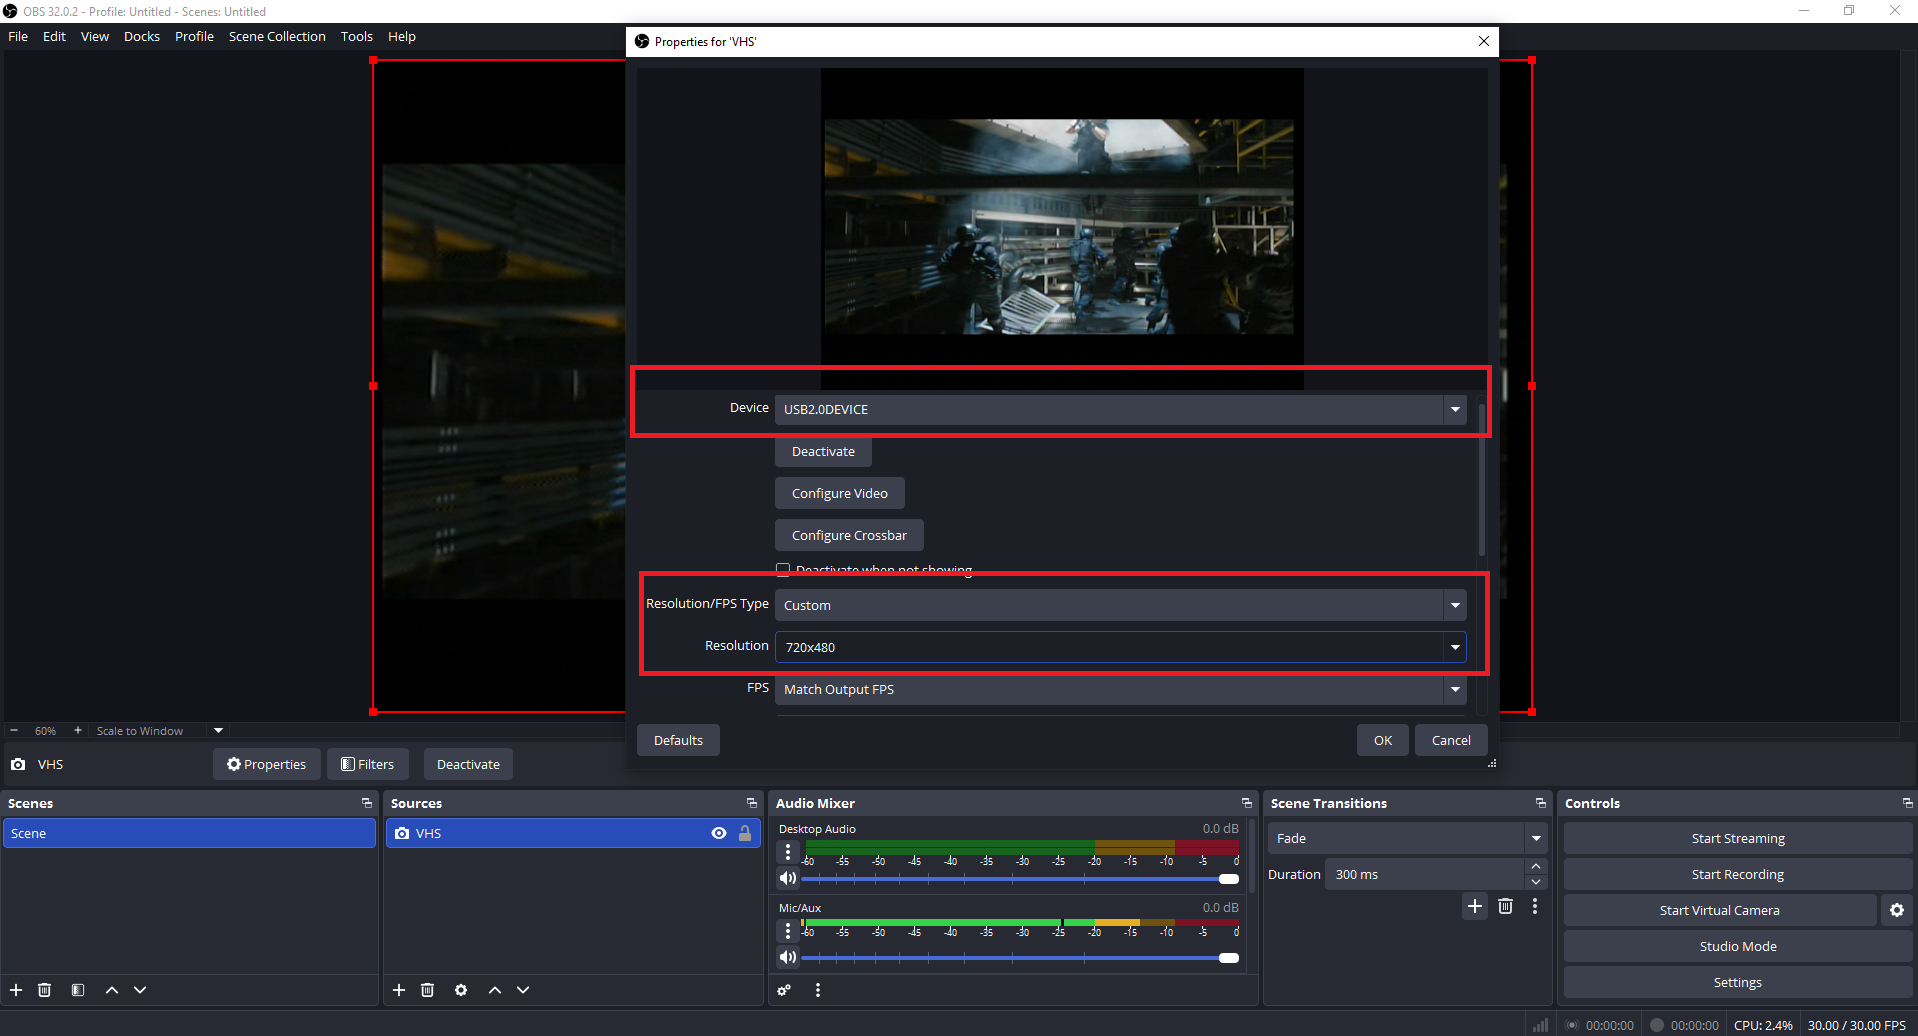
- In the Device dropdown list, choose USB 2.0 DEVICE (1:36).
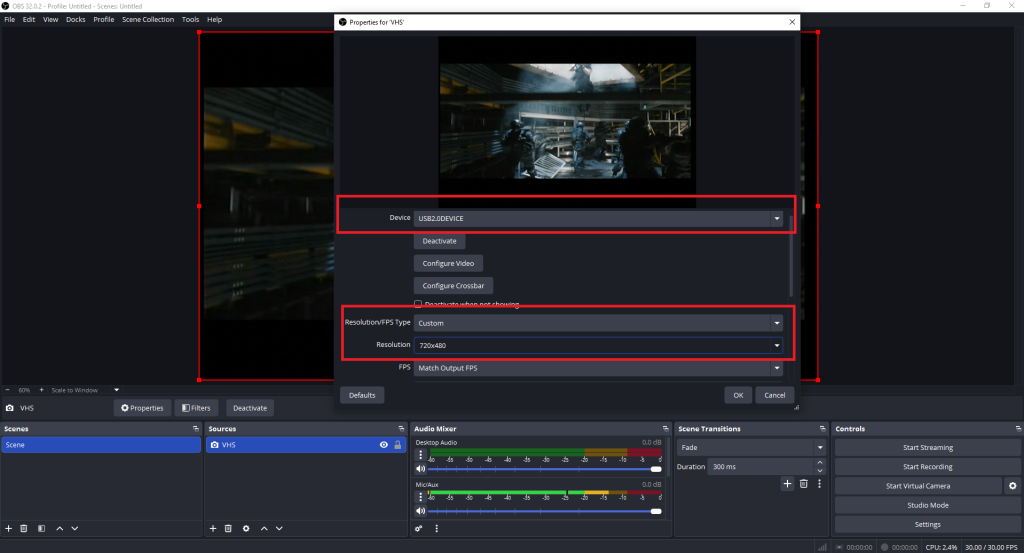
- Change Resolution/FPS Type to Custom.
- Set Resolution to 720×480 and FPS to 30 (1:50).
- Go to top menu bar: Settings > Video, and set both resolution options to 720×480 (2:01).
- Fitting Your Screen: Right-click the video preview screen, move your mouse over Transform, and click Fit to Screen.
4 Mac Settings (Only do this if you are on Mac)
Notice for Apple / Mac Users. On Mac computers, your video preview will remain black until you select the audio device inside the video settings below.
- In OBS Studio, double-click your “VHS” source under the Sources box (or right-click it and select Properties).
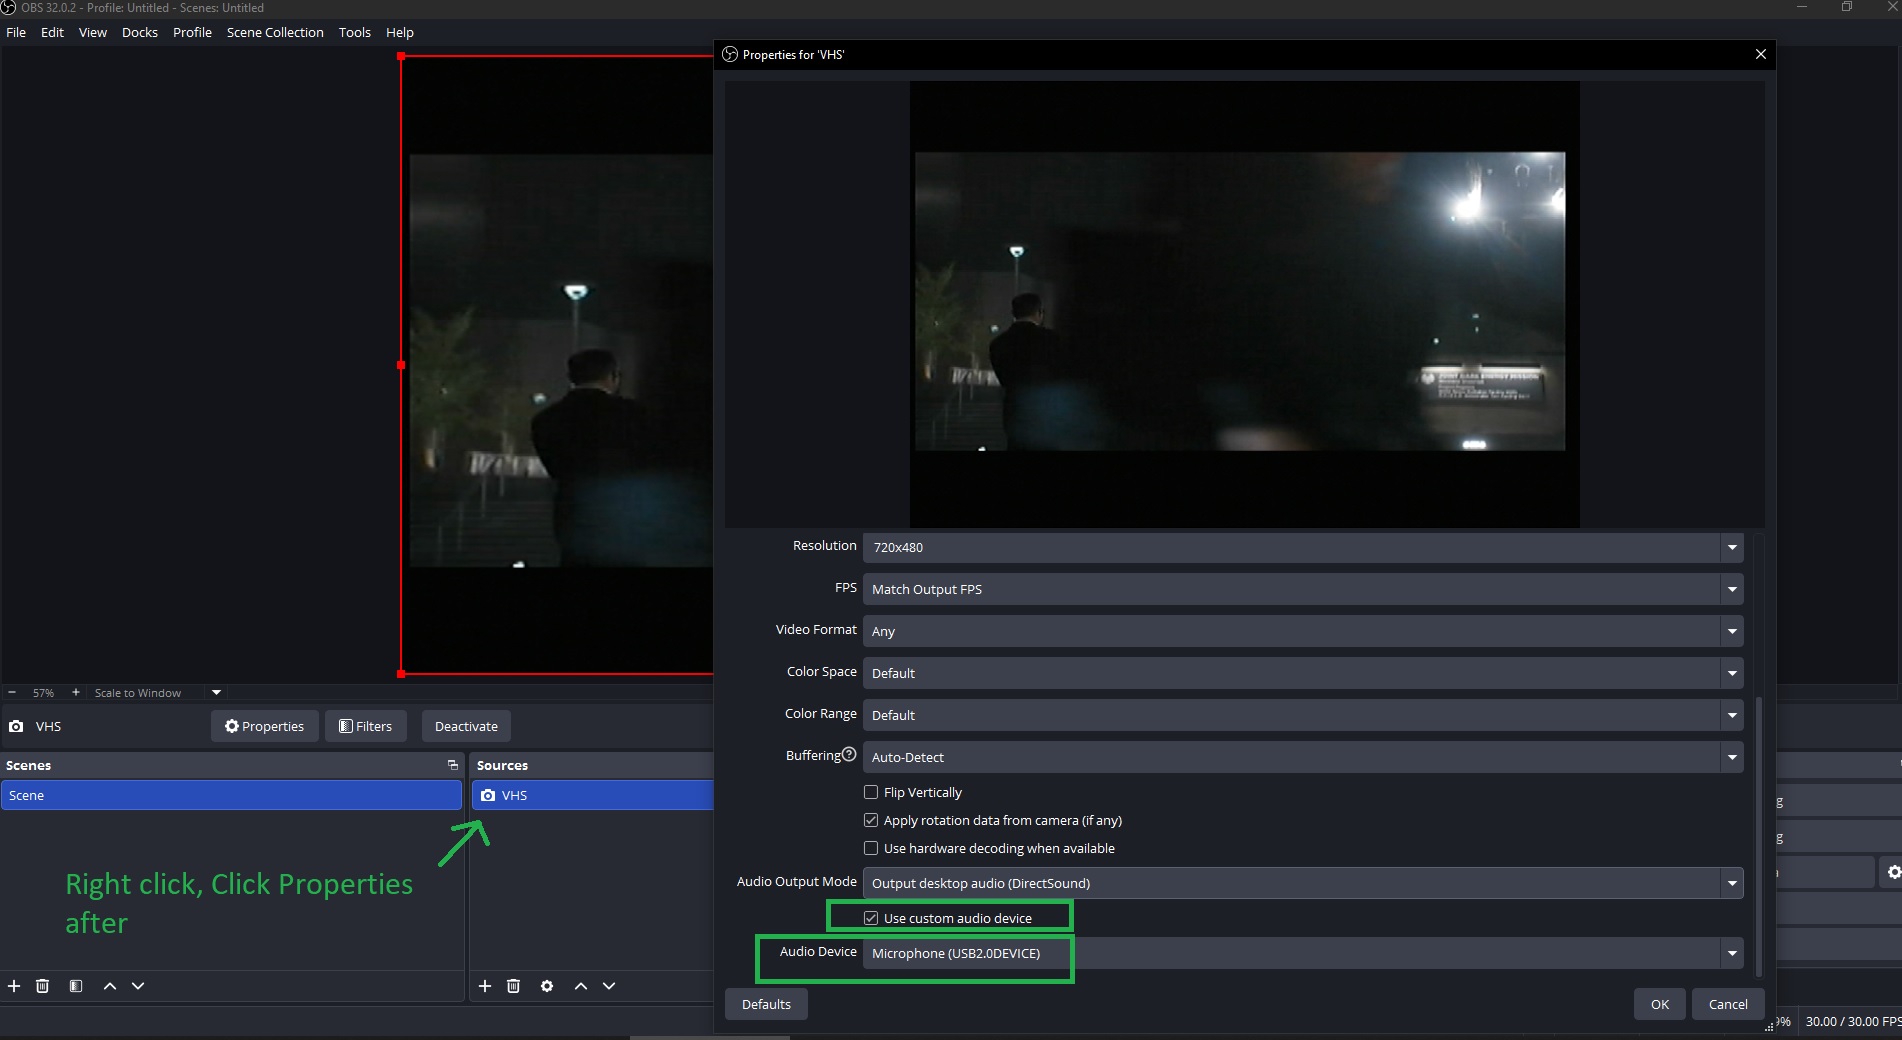
- Scroll down to the bottom of the window and check the box next to Use custom audio device.
- Click the Audio Device dropdown menu and select Microphone (USB2.0DEVICE).
- Click OK. Your picture and audio will now display and play properly.
5 Setting Up Sound & Audio (2:28)
- Click Settings in the bottom right corner, then click Audio on the left side.
- Find Mic/Auxiliary Audio 2 and choose Microphone (USB 2.0 Mic) (2:48). Click Apply, then OK.
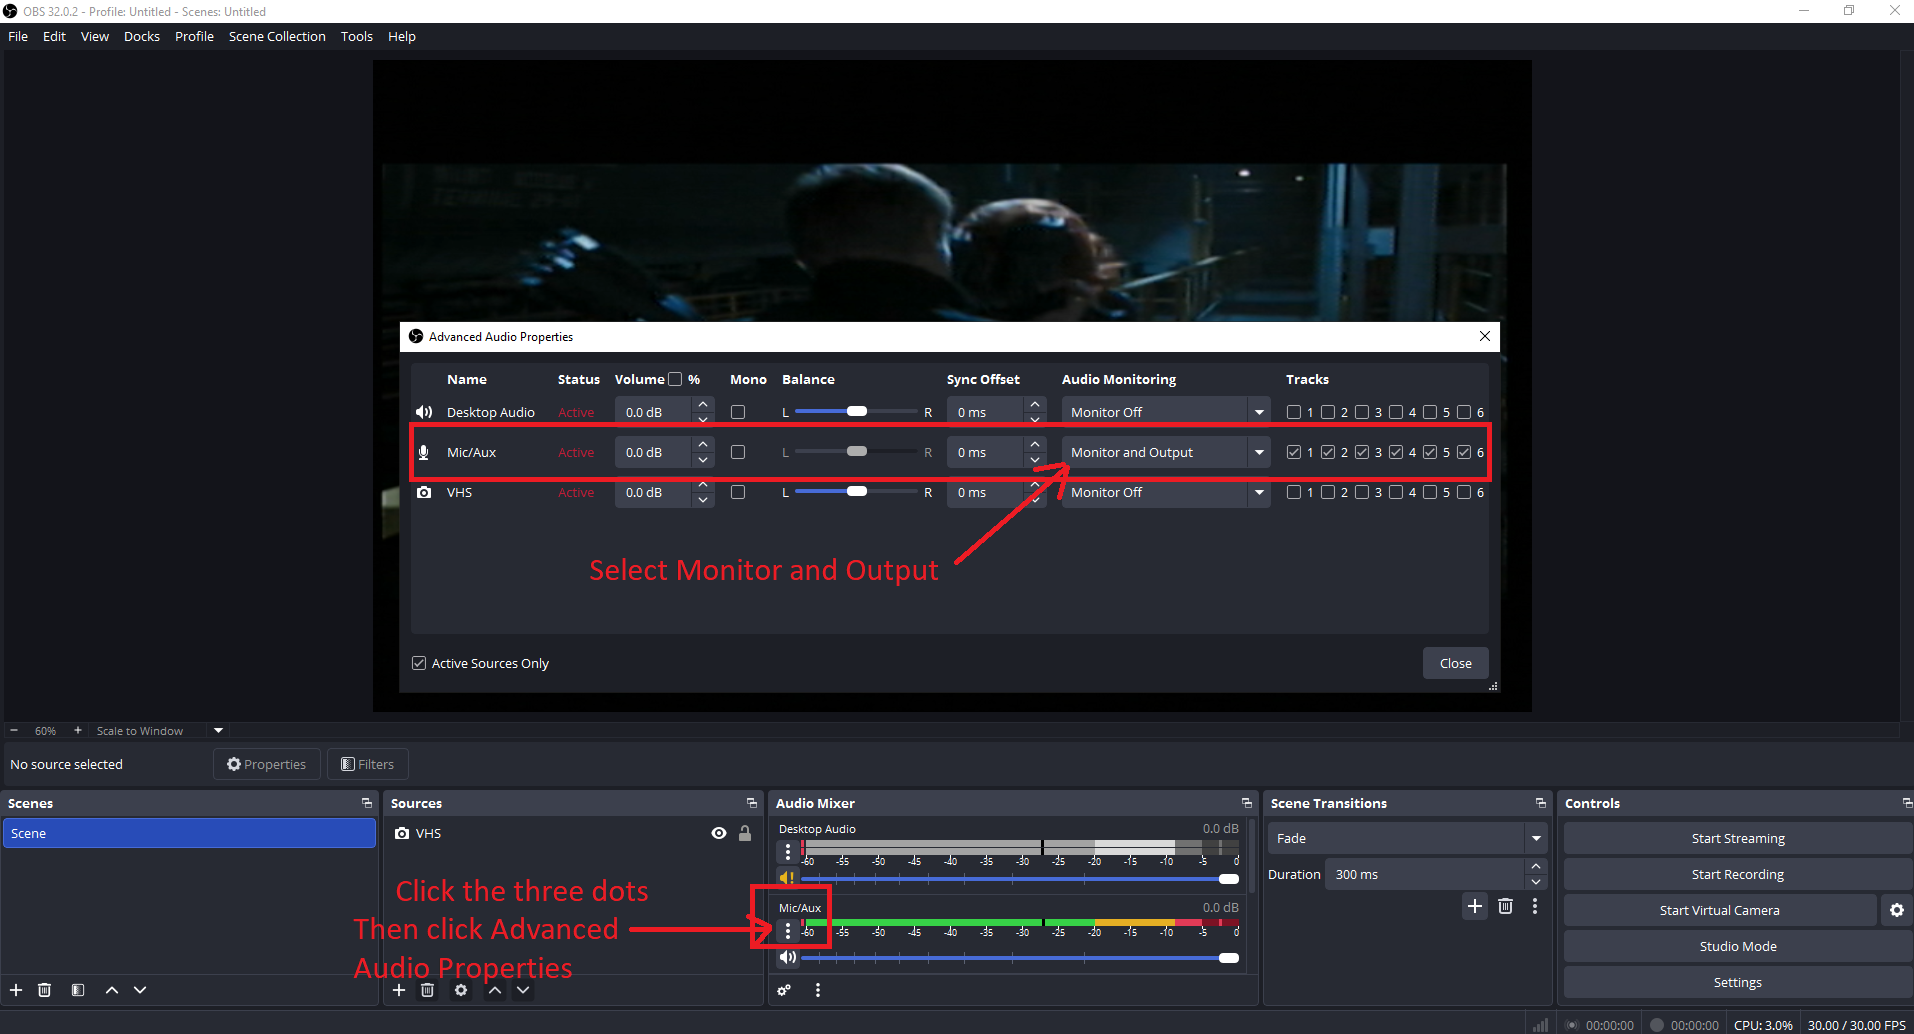
- Look at the Audio Mixer section at the bottom of OBS. Click the 3 dots next to your audio meter and select Advanced Audio Properties (3:09).
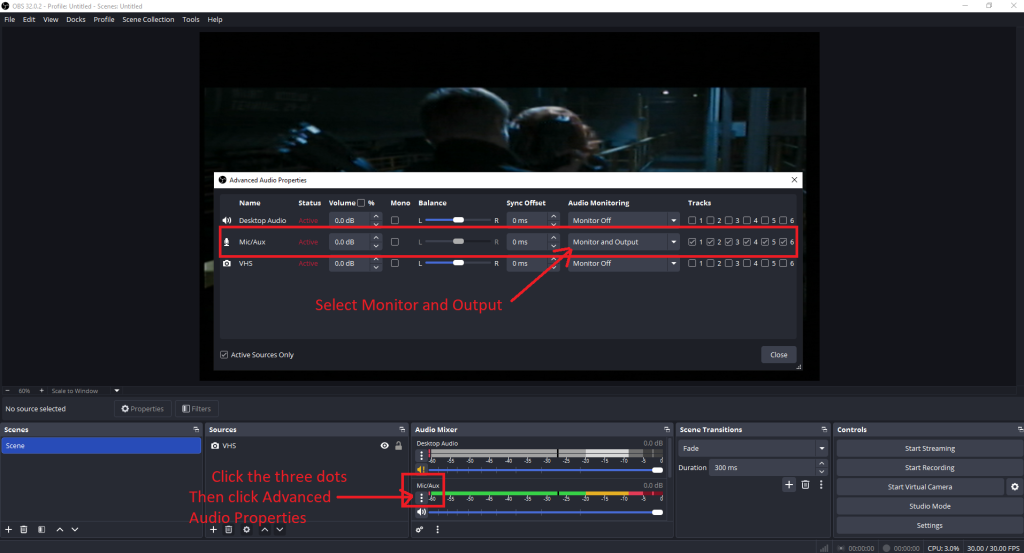
- Change Audio Monitoring to Monitor and Output so you can hear the sound through your speakers while recording (3:32).
Quick Tip for Windows 11 Users
Windows 11 includes built-in audio enhancements that can sometimes make VHS audio sound muffled or fade in and out. For the best capture quality, we recommend turning this off before you record:
Right-click the speaker icon in your Windows taskbar > Sound settings > More sound settings. Under the Recording tab, right-click USB 2.0 DEVICE > Properties > Advanced. Uncheck Enable audio enhancements, then click Apply and OK.
6 Choosing Where to Save Your Videos (3:38)
- Go to Settings > Output.
- Change Output Mode at the top to Advanced.
- Click the Recording tab, set Recording Format to MP4, and click Browse to choose the folder on your computer where you want your videos saved (3:51).
7 How to Record Your Tapes (4:36)
- Click the Start Recording button in the bottom-right control panel of OBS Studio.
- Press Play on your VCR or Camcorder.
- When your video is finished, press Stop on your VCR and click Stop Recording in OBS (4:52).
- Finding Your Video File: At the top menu of OBS, click File > Show Recordings. This will automatically open the folder containing your recorded video.
8 Frequently Asked Questions & Troubleshooting
Video Problems
Black Screen:
- Black Screen on Windows: Open Windows Settings > Privacy & Security > Camera and make sure “Let desktop apps access your camera” is turned ON (5:42).
- Black Screen on Mac: Open System Settings > Privacy & Security > Camera and make sure the switch next to OBS is turned ON (6:12). Also, go to Section 4. Mac Settings (Only do this if you are on Mac) if you have not done this yet.
- If you still have black screen: Connect your Diamond device directly into USB ports built into your computer (rear USB ports on desktop towers work best). Avoid unpowered USB hubs or extensions.
Fix Dark, Dull, or Washed Out Video:
Right-click your video preview in OBS, select Filters, click the + icon under Effect Filters, and pick Color Correction. You can adjust the Brightness and Color sliders to brighten up old tapes.
Fix Jagged Lines on Moving Objects (Deinterlacing):
Right-click your video preview in OBS, select Deinterlacing, click Enable, and choose Yadif 2x or Linear. This smoothes out jagged lines on fast movement.
Audio Problems (“No Audio” or Audio Out of Sync)
No sound:
- Please make sure you have followed 5. Setting Up Sound & Audio (2:28).
- Windows Privacy Setting: Open Windows Settings > Privacy & Security > Microphone and ensure “Microphone access” and “Let desktop apps access your microphone” are set to ON.
- Missing or Partial Audio (Windows 11): Windows 11 often applies automatic processing (like noise cancellation) that can mute or butcher stereo channels. Right-click the speaker icon in your Windows taskbar > select Sound settings > scroll down and click More sound settings. Under the Recording tab, right-click USB 2.0 DEVICE > select Properties. Go to the Advanced tab and uncheck Enable audio enhancements, then click Apply and OK.
- Alternative Audio Selection: Double-click your video source under Sources, scroll to the bottom, check Use custom audio device, and pick Microphone (USB2.0DEVICE) directly inside the properties.
- Cable Ports: Ensure your Red and White RCA cables are plugged into the AUDIO OUT ports on your VCR (not Audio IN).
Audio Out of Sync with Video:
Open Advanced Audio Properties in OBS and set a positive Sync Offset (start with 100 ms to 200 ms) (6:35).
Video Editing & DVD Burning
Editing Your Videos:
To trim or edit your recorded MP4 files, free tools like CapCut (www.capcut.com) or Shotcut (www.shotcut.org) work great. If you need software to burn your videos onto a physical DVD disc, email us at [email protected] and we will provide it to you.
Important Purchasing Note. We strongly recommend buying VC500 devices directly from Diamondmm.com or our official Amazon Store Page. Secondhand units purchased on eBay or at garage sales often contain old chips that do not work with modern Windows 11 computers.
Updated on 10/13/2026